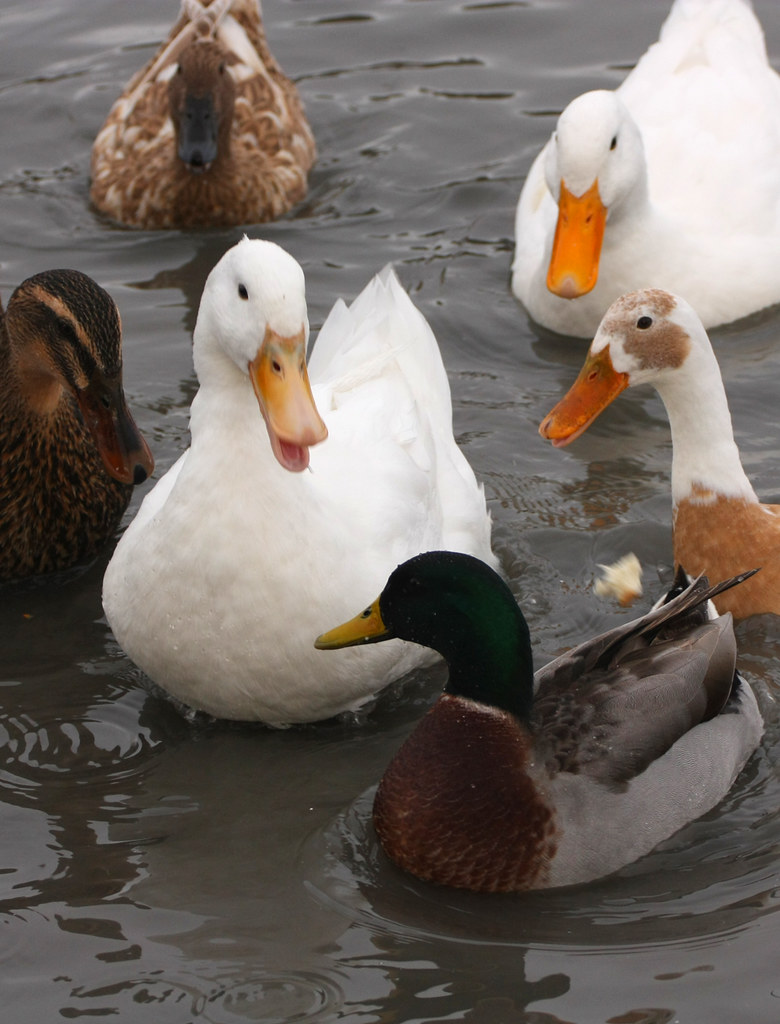
I got a new camera bag yesterday (thanks, Mom and Dad!), and in celebration, decided to go down to a little pond not far from my house. I brought my own 18-55 mm kit lens, and my dad's 100-300 mm L telephoto.
There were some people feeding the ducks that live at that pond, and they said it was fine if I came close enough to get pictures. I think I got a lot of good ones. Ducks are pretty friendly, not exactly camera shy; especially when there's someone with bread in the vicinity.
click to enlarge, or see it on Flickr Aperture: f/6.3
Shutter Speed: 1/500
ISO: 400
Focal Length: 112 mm
Monopod
The white duck in the center was particularly fierce when it came to defending what he considered "his" bread. This photo looks like he's telling off that mallard for intruding on his space.
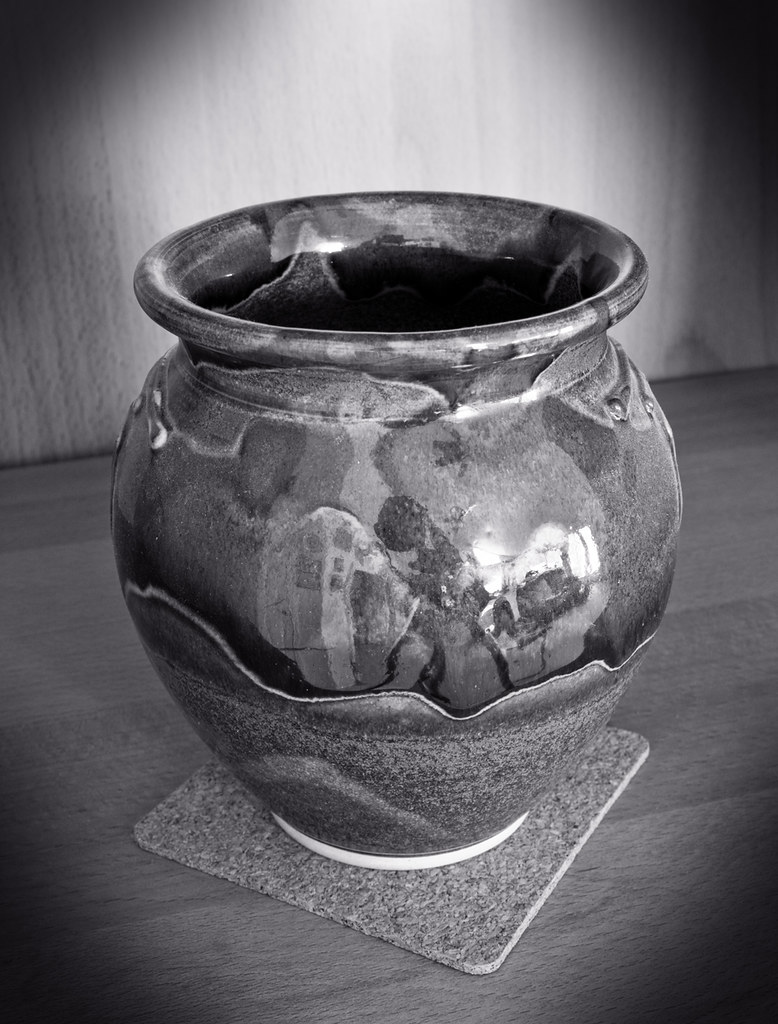
Yesterday, I took my camera down to a ravine near my house. Though I only really got one good shot from the trip, I was pretty happy with it. There are some features on my camera that I didn't think I would ever use, but have proven invaluable. This is the first color photo I've ever shot in RAW.
click to enlarge, or see it on Flickr Aperture: f/5.6
Shutter Speed: 1/200
ISO: 100
Focal Length: 55 mm
Tripod
I think the difference is much more noticeable in monochrome, although, granted, this photo has a pretty limited color palette. This photo is one that is better viewed in full-res, but 1024 pixels wide will certainly be an improvement over 400.
The real cool parts about this photo are Mirror Lockup and Live View. Live View was something I was trying to get away from by upgrading to a DSLR. I thought manual focus could never be as good on a screen with a limited amount of pixels as it is through a real optical viewfinder. Well it turns out in Live View mode, I'm able to zoom into the photo all the way to 100% view, at any area in the frame I want. Because of this, I learned that auto focus does a great job, and manual focus does a better job when the subject isn't moving.
Also, Mirror Lockup has really impressed me. I never thought it would make that much of a difference with camera shake to get the mirror out of the way first. But when you're in really close, or going for maximum sharpness, it makes a world of difference. I was very surprised. Whenever I'm on a tripod and my subject isn't moving (at all... like an inanimate object, not just a person who is holding still), I use both Mirror Lockup and Live View MF now. Together, they work wonders.
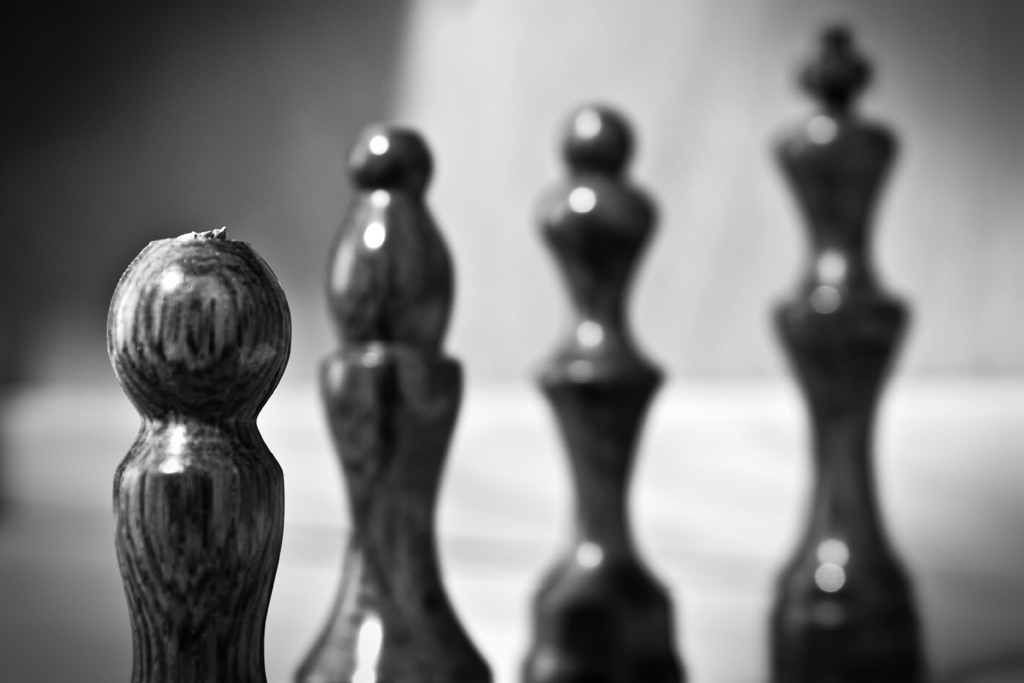
While shooting a redux still life a couple of days ago, I found out something that has rocked my photography world. It may sound obvious to you more seasoned photographers out there, but it has completely changed the way I think of this kind of photography:
When you're the guy setting up objects for the shot, you get to be the guy controlling the light, too. All of it.
When I put it to words, it sounds like something that should be followed up with a quick "uh... yeah. Duh." But seriously. I was re-trying the chess piece shot from this post in an attempt to make it better, and it kind of hit me that I wanted to control where the shadows from the chess pieces went. I went and grabbed a portable light that I use in the woodshop and tried a whole bunch of different configurations. It was really fun. Eventually, I decided that this one was the keeper:
click to enlarge, or see it on Flickr Aperture: f/7.1
Shutter Speed: 1/5
ISO: 100
Focal Length: 33 mm
Tripod
An interesting story about this photo: I tried editing it in the style of my series, Motionless. I absolutely hated what it did to my photo. Something in me strongly objected the to vignette and the tint, to the point that I just couldn't leave it that way. I deleted that version and started over until I got it how I liked it.
So a good day for photography. I learned that controlling the light = win, and that in post-processing, the photo really is the boss.
I've started a new series on Flickr, called "Motionless." It features still life photos in monochrome. To help the photos feel more like they are part of a set, they all have a subtle lilac tint and a vignette. For this reason, I suspect most (if not all) of them will be center-composed, but I can't be sure yet as I haven't taken more than one so far. Here's the first.
click to enlarge, or see it on Flickr Aperture: f/11
Shutter Speed: 5 seconds
ISO: 100
Focal Length: 29 mm
Tripod
I think I may finally have fixed the problem I was having with terrible compositions. This one may be slightly boring (centered subject), but it's not breaking a bunch of rules at least, and there are no obnoxious lines leading away from the focus.
I'm pretty excited for this set to grow. I'm hoping to really expand my horizons here in still-life photography, monochrome photography, and composition. And don't worry: no more pottery still-lifes :) And I won't be tracking the set on this blog, so you'll still see a variety of photography types.
This is just another B&W still life shot in RAW. I've ranted about the benefits of monochrome shot in RAW enough, I think. You get the idea.
click to enlarge, or see it on Flickr Aperture: f/8
Shutter Speed: 2 seconds
ISO: 100
Focal Length: 43 mm
Tripod
Once again, I hate the composition on this. I guess that's a good thing about shooting B&W photos though: I tend to notice things like that more, and it should force me to become a better photographer, which is the whole point.
I think I'm going to try experimenting with some color tints on my still lifes, just to give them a bit of flavor. We'll see where this goes.
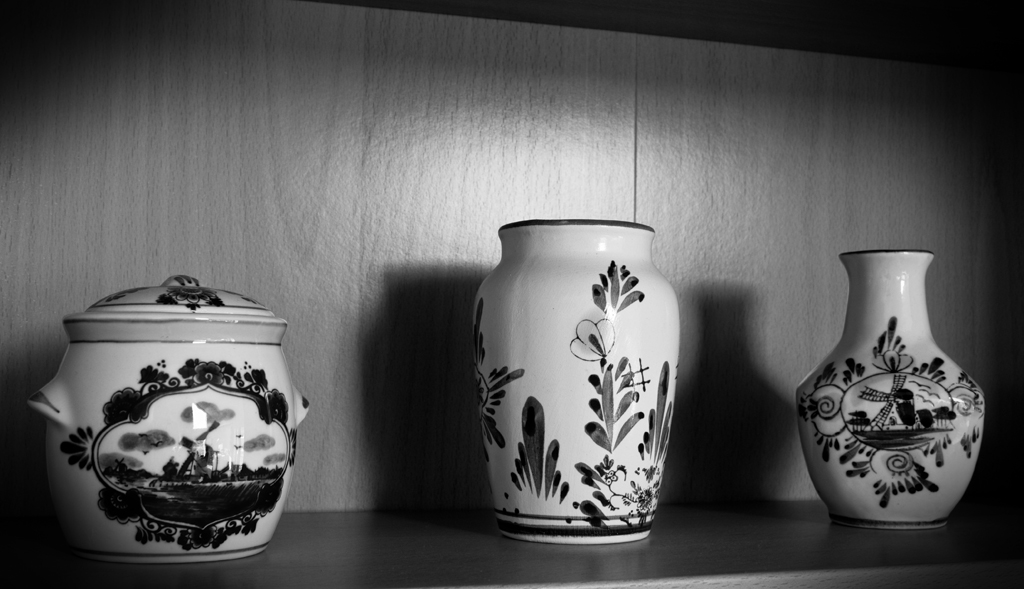
I have fallen in love with another specific form of photography. Monochrome still-lifes. Monochrome in general is so lovely when I have the flexibility of RAW. I've noticed a HUGE difference.
click to enlarge, or see it on Flickr Aperture: f/11
Shutter Speed: 0.6 seconds
ISO: 100
Focal Length: 27 mm
Tripod
I'm not extremely happy with the composition on this. Lines, etc. become even more important than usual when you shoot monochrome, because there isn't color to distract your eyes. So in an attempt to mask some of the lines that are leading the eye in stupid directions, and just generally keep the focus on the center, I added a not-so-subtle vignette. It helped, but I still need to figure out better composition when shooting things like this.
I really like the contrast though, and the shadows behind the vases looks pretty good, as well as the kind of flare of light on the wood. Man, Nature Macro photography is going to be so jealous.
A couple of days ago, I shot this still-life of some chess pieces I made over a year ago. While composing it, I thought it might look good in monochrome, so I went ahead and shot in RAW+JPEG mode. That way, I figured, I could try playing with the RAW file in Lightroom, and if I didn't like it I could always default to converting to monochrome from the JPEG in Photoshop.
Turns out I was right. It does look good in monochrome.
click to enlarge, or see it on Flickr Aperture: f/6.3
Shutter Speed: 6 seconds
ISO: 100
Focal Length: 36 mm
Tripod
The Lightroom tools for monochrome are extremely intuitive, even when working in RAW. In fact, had I not known, I wouldn't have been able to tell that I was working in RAW. When I was happy with my result, I exported to JPEG. Just for comparison purposes, I did my best work on the JPEG with Photoshop to see if I liked that result any better. It wasn't even close. RAW is champion when it comes to monochrome. I couldn't get close to the amount of contrast I wanted without severe posterization.
My last step was just to experiment with a vignette in Photoshop until I liked it. There are a few things I feel I could have done better, and a couple of things I thought I wouldn't like, but turned out really good. The pawn isn't in sharpest focus. It's pretty close, but I should have been paying more attention when I set the shot up. The aperture could have been stopped down just a little more, to achieve the really distinctive hierarchy of levels of focus I was going for. And I didn't think the unfinished tops of the pieces would look good, but I think they add some character to the shot.
I may try a redux of this shot sometime with a more carefully set-up environment, etc. But now I know: for monochrome photos, don't bother with anything but RAW anymore.
I ran amok yesterday at the debate tournament. It was distributed over the whole school, so the atmosphere of the whole day was pretty relaxed. In all, I took about 250 photos with the Yearbook's XSi. Lots more learning experiences.
click to enlarge, or see it on Flickr Aperture: f/9
Shutter Speed: 1/25
ISO: 100
Focal Length: 53 mm
Monopod
click to enlarge, or see it on Flickr Aperture: f/9
Shutter Speed: 1/50
ISO: 100
Focal Length: 55
Monopod
Portraits with REAL focal lengths > portraits with the PowerShot. Can't wait to shoot my Prom group's pictures. 55 mm on the Rebel XSi's sensor is about 88-90 mm 35 mm equivalent. Which is right in the middle of happy portrait land. So, even more so now, I'm really excited!
As I mentioned yesterday, I borrowed one of the Yearbook staff's Rebel XSi's. I needed it to shoot photos for my article today, but you didn't actually think that was going to prevent me from using it for my own personal use yesterday, did you?
click to enlarge, or see it on Flickr Aperture: f/5.6
Shutter Speed: 2 seconds
ISO: 200
Focal Length: 55 mm
Monopod
From this one shot, I've learned a LOT of things about the camera, and how it differs from my PowerShot.
-This was taken with the kit lens. The KIT LENS! That means I can do pretty satisfactory macro work with the lens it comes with. Even better though, is my dad's f/2.8 macro lens that goes 1:1 and is compatible with the EF-S mount on the XSi. -The aspect ratio of this camera is different from that of my PowerShot. It's a little wider, or possibly just not as tall. But when you have 12.2 megapixels, cropping to fit a monitor won't be a problem at all. -I feel like the camera is more stable in my hands than I do with the PowerShot. I used a monopod for this photo. Granted, it was in an excellent position of support. But I can't conceive of using a monopod with my PowerShot and getting even usable results at 2 seconds. -The DoF on the Rebel is a whole different beast. I've come to the conclusion that the really small focal lengths involved with my PowerShot are what really hurt my DoF. I could shoot a landscape at f/2.6 on my PowerShot and have trouble distinguishing it from the same photo at f/8, because the differences in DoF really didn't become apparent until I was very close to my subject. With these longer focal lengths, I have much more fine-tuned control over my DoF. -This picture didn't involve the flash, but I did play around with it a little. That bugger charges really fast. Like, REALLY fast. Like, I can shoot it in burst mode and still get more frames/second than my PowerShot without a flash. -Oh man. I'm excited to get my own.
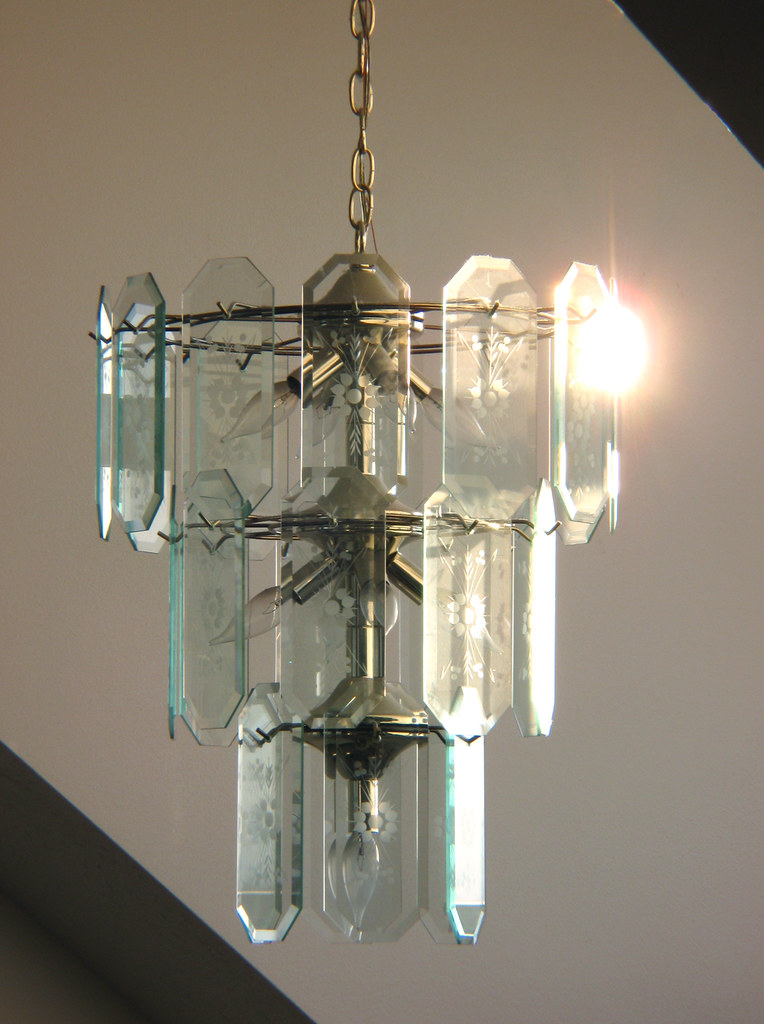
I was upstairs yesterday when I noticed the light was coming through a window pretty horizontally and shining off our chandelier. When I got everything set up to take the photos, I noticed that various parts of the walls, ceiling, etc. were creating symmetrical natural framing at the angle I was shooting at to get the sun's reflection.
click to enlarge, or see it on Flickr Aperture: f/5.5
Shutter Speed: 1/60
ISO: 80
Monopod
So I'm pretty happy with this photo. I cooled down the temperature a bit in Photoshop, because I like the facets of the glass when they're a cyan-ish blue. I also had to clone out some gross cobwebs. I guess you don't notice them until you're photographing them.
In other news, I borrowed a Canon Rebel XSi from the yearbook class at my school to take photos for my article in the upcoming issue of our school paper. I mostly borrowed it to try it out. Holy cow. I can't wait for mine to get here.
So despite the fact that I believe I had excellent lighting, (overcast, and not 12-noon sun positioning) I'm not completely satisfied with how these portraits turned out.
click to enlarge, or see it on Flickr Aperture: f/2.6
Shutter Speed: 1/500
ISO: 80
Tripod
Despite the fact that I purposely put the background elements way far back from the subjects, and shot at a very wide aperture, my background absolutely refused to blur. This could just be because of my super short focal length (because the camera I used for this isn't DSLR, my focal length was actually 5.8mm, though I think the small sensor size makes it appear longer). Other than that, I have no freaking explanation.
Pretty frustrating, but within about a week, I'll have my Rebel XSi and P&S focal lengths will be a non-issue. If any of you more experienced photographers have any kind of advice on how to make these better, please share. I still consider myself a total portrait noob.
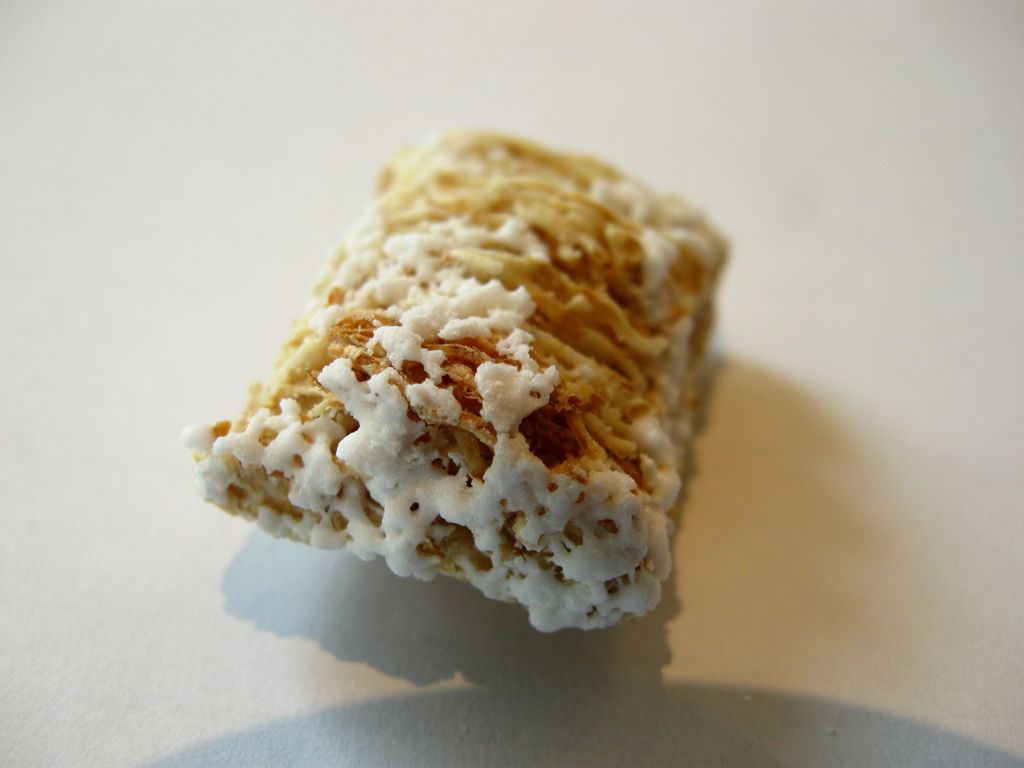
Hi everyone. Sorry about the late post. I try not to treat my blog in a perfunctory way, but I refuse to miss a day of posting just because I didn't get a good photo for the post.
I actually did take some portraits today, but I'm going to get permission from the subjects before posting them. Anyway, here's today's humble submission, for your consideration.
click to enlarge, or see it on Flickr Aperture: f/2.6
Shutter Speed: 1/30
ISO: 80
Gorilla Pod
Yes, it's a frosted mini-wheat. I'm happy with the white-balance setting on my camera. I used "manual" and set it using a piece of paper. The shadows I'm not so happy with. But the focus is good, and the image is crisp!
One of the biggest things I'm looking forwards to with the arrival of my Rebel XSi is the ability to attach an external intervalometer (a device that takes photos at a pre-set interval) of some sort to take time-lapse photos without my constant attention.
While looking up such a device (expecting to find one built into some remote shutter release or cable of some sort), I found this. Cool. I already have one of those for my AP Calculus class, so that unlocks some time-lapse possibilities without spending any money.
For some reason, I continued searching for things like this, when I stumbled across a site called CHDK, which stands for Canon Hack Development Kit. It's basically a large database full of open-source coding that has been done to add extra cool features to your camera. It's kind of a hassle to install (and took me a while to figure out; it's kind of tech-y), but among the scripts, I found an intervalometer that works with my model of camera and my version of firmware. Looks like I get to do some better time-lapses before my XSi gets here after all.
I tested it out today. The setting was one photo every 45 seconds, stopping after 200 photos. I set everything up, and left it to its work. After a few hours, I came back and checked on the progress. The battery was dead. But it had made it to 177 photos first! The reason the battery died is because for some reason, the camera will not operate in manual focus with the LCD display turned off. So I am forced to leave the LCD on in fear of the autofocus getting off at some point during the shooting. Fortunately, the XSi is exactly the opposite of that: the autofocus won't work with the LCD on Live View.
Enough talking for now. Here's the video:
My apologies for the obnoxious color cast shifts. Of all the things to forget to set manually, white-balance wasn't the worst one. But it's still kind of a noobish mistake.
On the bright side, I've been hit with another realization: the choppiness of my previous time-lapses was primarily due to the human factor involved in the intervals between exposures. When the computer handles the intervals, it gets the exactly the same. No matter how hard I try, I'll always have a bit (or more) of error in my timing shots. So never mind worrying too much about finding a 1-frame-per-photo video editor, this already looks significantly smoother.
Bottom line: Yes, the XSi will do a better job. But it's cool to know that you don't have to have pimped-out equipment to do really good time-lapse photography.
This post will not feature any photos. Rather, this post is a great tip on how to make your (yes YOUR) blog better.
Think back to the last time you commented on someone's photo blog. Did you see one of these?
I bet you did (unless it was my blog, of course). Now ask yourself: was a CAPTCHA phrase necessary for this blog? If the blog in question has fewer than about 1000 readers, the answer to that question is "no."
Unfortunately, Blogger.com has taken it upon themselves to protect their users against insidious spammers that attack small-time blogs. So having a CAPTCHA phrase is a default setting.
Fortunately, after extensive research and much personal sacrifice, I have discovered a method that lets you deactivate it.
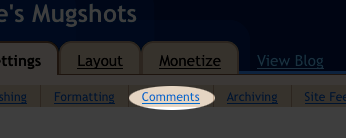
First, go to your dashboard. You should see something similar to this:
Click the "Settings" part. Now click here:
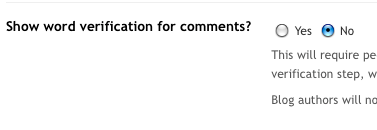
Scroll down until you find this:
Click the "No" button. Save your changes, and enjoy adding minuscule amounts of time to all of your readers' lives! Congratulations.
P.S. If this post seemed rude, it's not. Just somewhat sarcastic. I'm like that.
Yesterday I went down to see the photography display that my dad and I both entered. Unfortunately, the museum where it was being held was closed by the time we got there. I guess it's a good thing the display goes for another couple of weeks.
Just goes to show that there's a good reason to carry my camera everywhere. Even when I can't see a photography show, there's always something to photograph.
click to enlarge, or see it on Flickr Aperture: f/6.3
Shutter Speed: 1/30
ISO: 80
Monopod
It's a nice photo, and I'm pretty happy with it. But the really interesting thing about it is that there was some chump who thought he could be in my picture standing (okay, walking) a ways down the path. Despite the fact that he was covering about four different kinds of backgrounds, I zoomed way in and managed to clone him out carefully. Even in the 768x1024 expanded view, it's pretty difficult to detect the cloned area. I guess that's good, but if I were to print this, I think it would be much easier.
So the lesson learned is that I need to wait for people to leave the frame unless I'm willing to spend a LONG time taking them out of the photo.
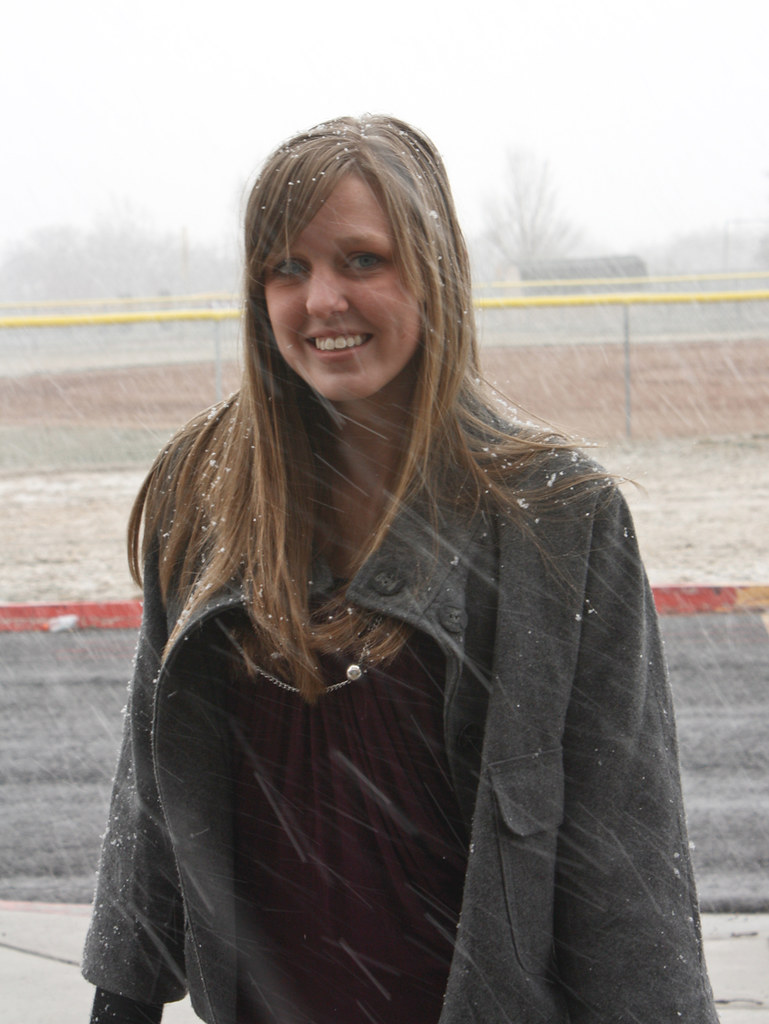
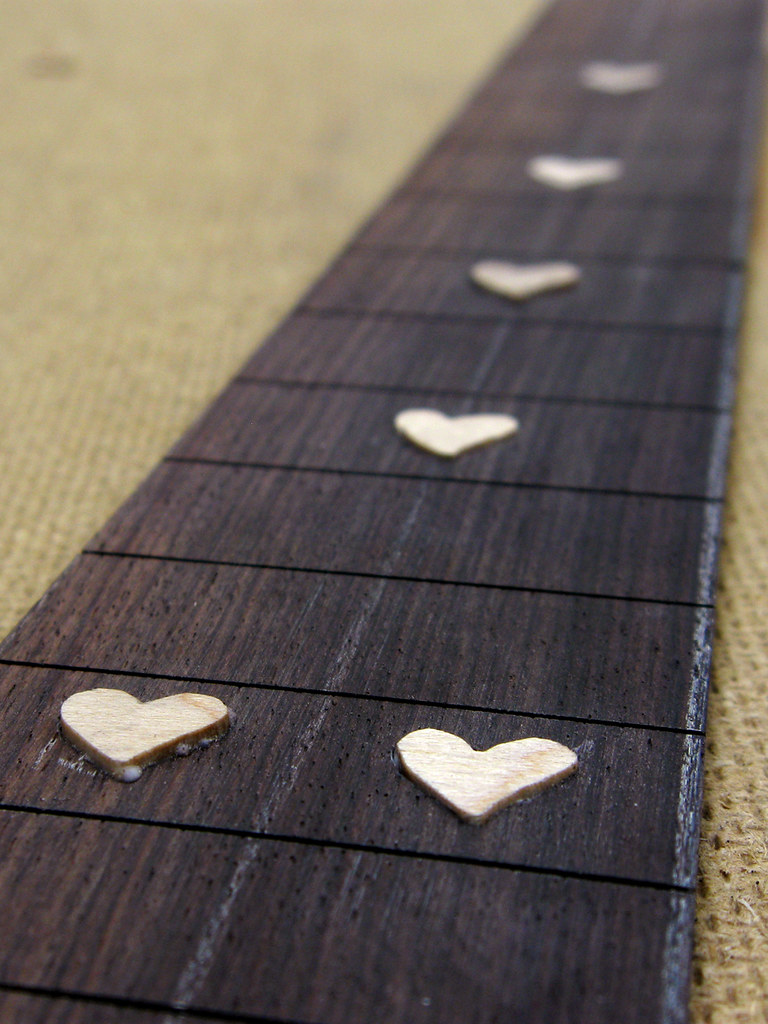
I rarely participate in these, because they're usually something kind of obscure that would be hard for my to photograph. But this one worked out perfectly. I remembered it while working on my guitar yesterday, and what do you know? The fretboard inlays I was working on were heart-shaped.
click to enlarge, or see it on Flickr Aperture: f/3.2
Shutter Speed: 1/80
ISO: 80
Gorilla Pod
I felt it was appropriate not only because of the heart theme, but because of how much I love my guitar, even if it's not finished yet.
In other news, even though I couldn't get a photo of this, my parents are buying me an early graduation present: A Canon Digital Rebel XSi! I'm so pumped!
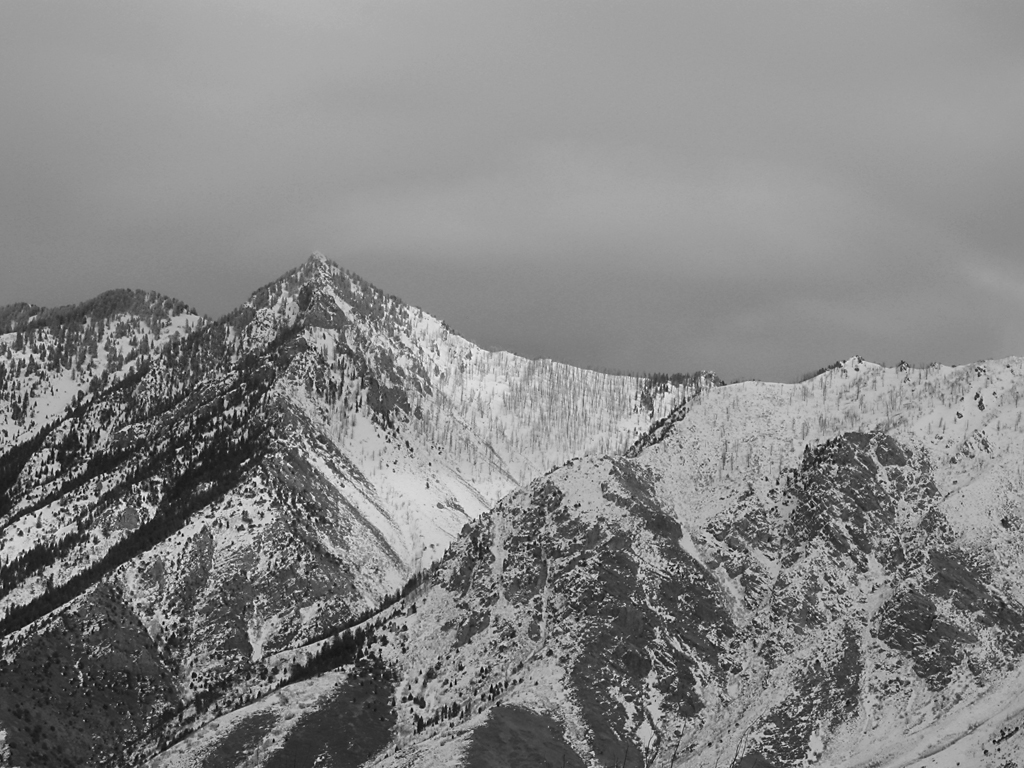
Ansel Adams, for those of you who don't know, is probably the most famous black and white photographer of all time. I recently read an article about him, which described his approach to photography, and his "zone system."
I won't go into great detail, but basically, Adams was about getting the sharpest possible images of landscapes, and then expanding the tonal range of the photo to get stunning results.
I wanted to try an Ansel Adams-style B&W today. Here's how it turned out.
click to enlarge, or see it on Flickr Aperture: f/7.1
Shutter Speed: (5 exposures)
ISO: 80
Tripod
The way around the relatively low (compared to an eye) dynamic range of a digital camera is similar to HDR. So similar, in fact, that I use the same program as I do for HDR: Photomatix. Apparently, snow should be exposed at Zone 7 if possible, which basically means it should be very white, and close to losing detail, but not washed out. So to expose this image, I used "spot" metering on my camera, and pointed it at the brightest spot in the image. It's pretty close to the center; right where the snow is purest. Your camera's meter wants you to expose everything at Zone 5, which is a "proper" exposure. Every stop on your camera is a Zone, so to get Zone 7 snow, I bumped it up two stops from what the meter told me to. From there, I took another photo at every stop going down until my histogram had no more white pixels. For this photo, that was 5 exposures.
In post-processing, I put the 5 images into Photomatix, and told it to "average." This gave me a nicer-looking image, but more importantly, expanded the number of tones I had to work with. From there, I applied a Channel Mixer Mask layer to desaturate the image, and bumped up the contrast quite a bit (which I could now do without worrying about posterization). Now I had my Zone 7 snow, but the trees were in Zone 2 or 3—dark, but with some detail. This is better than just getting an "average" exposure where my snow is probably at Zone 6, and my trees and rocks are at Zone 4 or 5.
Finally, I applied an Unsharp Mask to really make the details pop, just like Ansel Adams liked it. I know you're not supposed to do this until you're ready to print, because it's a destructive editing technique, but I have no plans to print this. It's kind of a poor photograph—not a very good vantage point, and nothing interesting in the foreground. I just wanted to test out the Ansel Adams approach to landscape photography.
Link me any images you try with this technique in the comments.
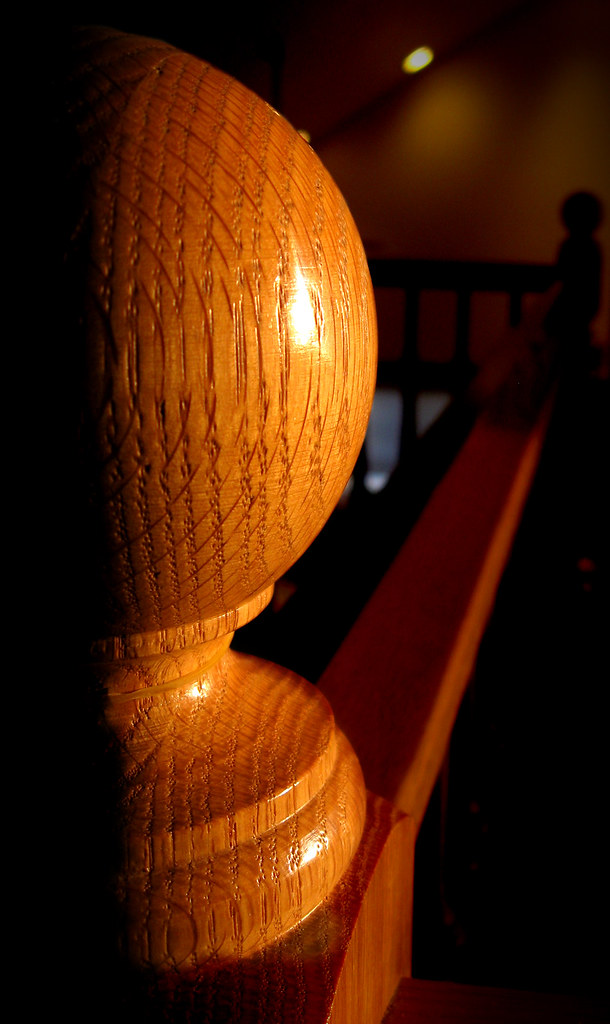
I took this photo yesterday during the sunset, and I liked it okay. The subject was good, but there was a lot of unavoidable clutter in the background. So I cropped it kind of weird to minimize background clutter, and then darkened the background out heavily.
click to enlarge, or see it on Flickr Aperture: f/2.6
Shutter Speed: 1/30
ISO: 80
Monopod
The side lighting (due to the fact that this was taken at sunset) gives the banister some nice dramatic lighting. I cranked the contrast up in Photoshop a little, but not a lot.
To darken the background, I just masked out the parts I wanted to keep at original brightness using Quick Mask mode and a relatively hard brush, then duplicated the selected area into its own layer. It wasn't perfect; if you look at the top right "corner" area of the base (below the large sphere part), you'll notice some odd ghosting that happened from using too soft of a brush in that area.
Once I duplicated out the foreground, I really took down the darkness on the rest of the photo (in the original layer). Then I flattened and added a vignette. Pretty easy, but I'm happy with how it turned out.
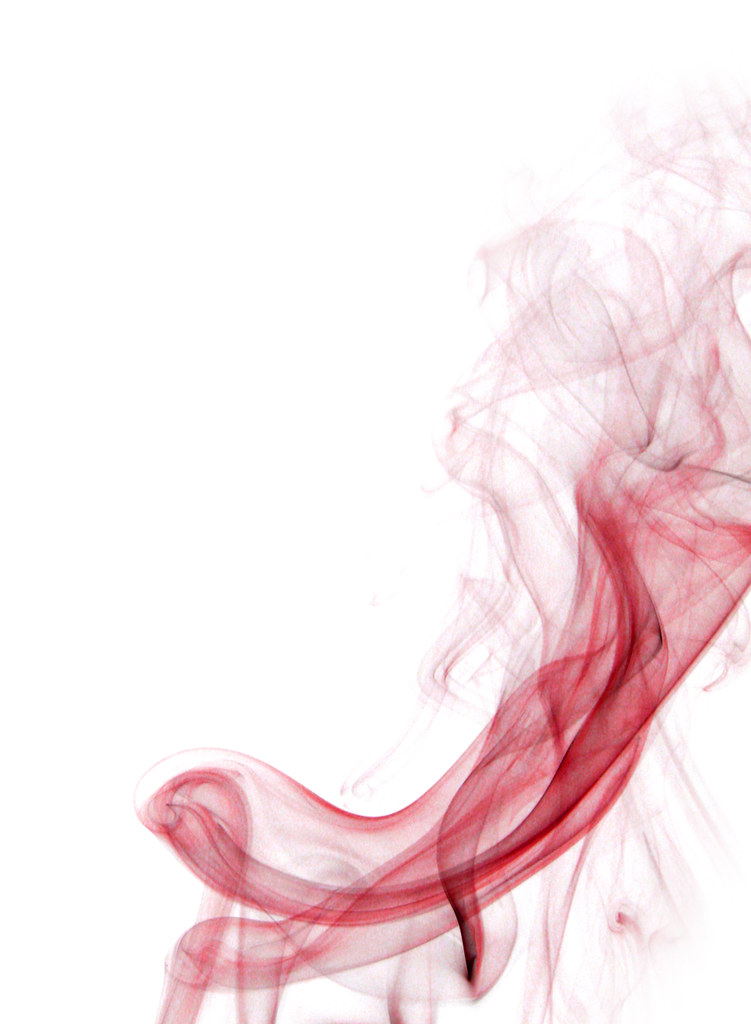
After reading this post by Nasyarobby, I decided I wanted to take a picture of smoke. Along the way, I ran into a whole lot of problems. Eventually though, I figured it out (at about 10:30 last night).
click to enlarge, or see it on Flickr Aperture: f/6.3
Shutter Speed: 5 seconds
ISO: 80
Tripod
Here's a run-down of the process.
Set up your equipment in such a way that you have a pitch black background (one that the computer would see as #000000).
You'll need something generating smoke (incense sticks are recommended, but I didn't have any, so after many unnsuccessful attempts using a candle, I finally started burning paper in a small glass container). Your smoke-generating object should be out of the frame, but only just; you want smoke wafting up through your frame. The closer you can get to filling the frame with smoke, the better, but I used zoom instead of getting close to the smoke with my camera. The two don't mix very well.
An aperture of f/8 to about f/13 is recommended. I used f/6.3 because... I don't remember why. But it seems to have worked okay. I also set my white balance to both "Cloudy" and "Flourescent." "Cloudy" gave me a more lifelike smoke color, but it doesn't really matter if you're going to post process it like I did anyway.
You need lighting from the side. The best way to go is an external flash gun that is synched to your camera. I don't have one, so I figured out a workaround. This workaround actually solved my lack-of-speedlight problem as well as my lack-of-pure-black-background-object problem. I just shot in pitch blackness. Keep a flashlight handy! With zero light getting into the room, I could set the exposure to be really long, and then have my wingman (my brother in this case) fire his flash at the brightest setting from the side of the smoke after my shutter opened, but before it closed.
Before you can start shooting, you need to lock your focus. I just held the tip of the lighter directly over the smoke-generator (with the lights on), and in the center of the frame, autofocused on it, and then locked the focus by switching to manual. Any time that adjustments are made to the position of the camera or the smoke-generator, you will need to repeat this focusing process.
So basically, I would light a dense wad of paper (denser balls will smolder and burn more slowly, generating more smoke volume), let it go out on its own, and then wait for a relatively vertical plume of smoke. Then I would open my shutter, tell my brother to fire his flash, and wait for the exposure to finish. All I had to do was put in more paper balls as needed and re-focus every once in a while.
Nasyarobby's blog post (linked at the beginning of this post) has another link to a video description of how to do this if you have the gear. I think the main reason for my less optimal results are not so much that I had to use a bunch of workarounds as that I didn't have a very consistent source of smoke, and I haven't yet mastered the art of filling the frame tightly with smoke. Because I tended to only get about a quarter of the shot that was useable (or not just plain black), I ended up cropping a lot, which accounts for the grain in the expanded version of today's photo. I may have over-stretched my megapixels.
Next time I post about smoke photography, I'll include instructions on how to get the white background, the colored smoke, and a few other little tips I picked up from various videos. If you're not patient enough to wait, you can probably find a video on YouTube by the same guy as the one linked from Nasyarobby's blog that shows most of the PP tips.
Any linked photos, advice, etc. in the comments are welcome!
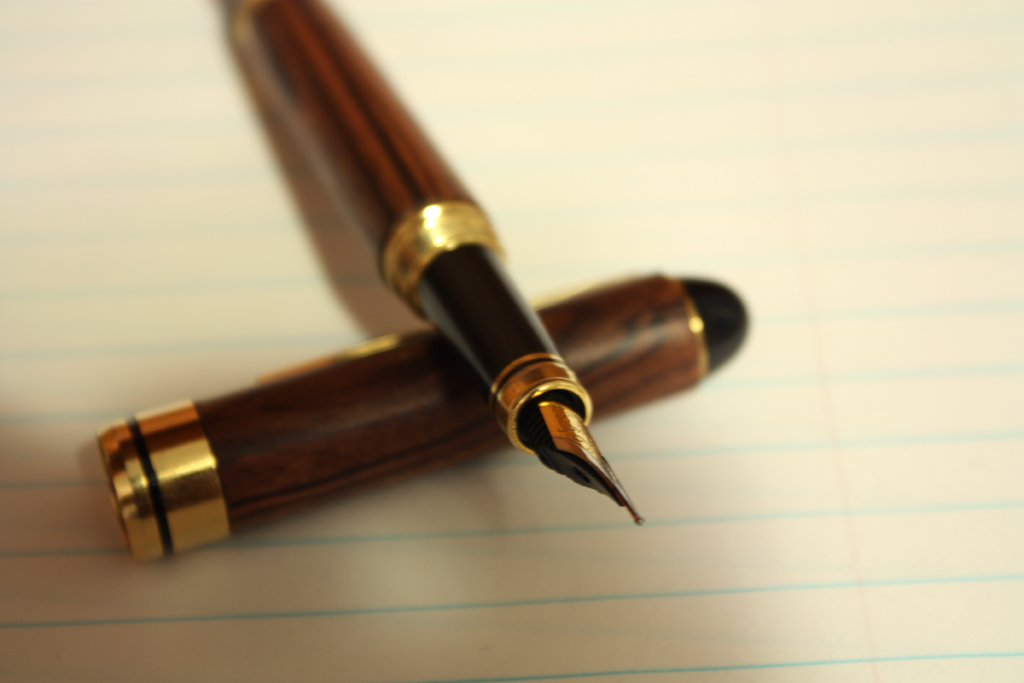
I tried again tonight, and got... closer. I'm still not there yet, although I think this time was due to being in a rush with post.
click to enlarge, or see it on Flickr Aperture: f/2.6
Shutter Speed: 1/15
ISO: 80
Handheld
I shot against a white background, with less "yellow" lighting, and fewer warm-cast objects reflecting the warm light everywhere. This made a huge difference. I also used a Levels adjustment mask layer to set the white point as the paper. It made it too bright, but I sort of compensated with Brightness&Contrast. But then the pen looked too dark, so I did one of those careful white radial gradients in Overlay blending, with about 50% opacity. I think it was still a little too much. There are elements in the image I'm not totally satisfied with. But I'm on the right path.
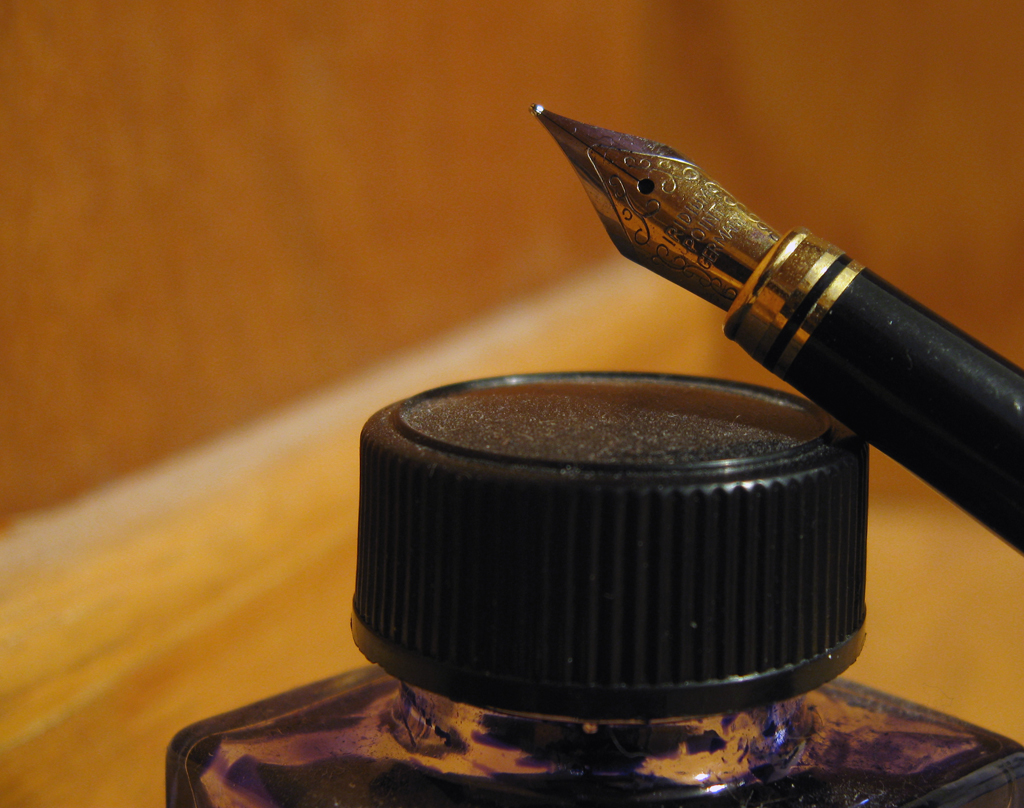
I wanted to take a picture of the fountain pen I made over last summer. I liked how it looked when "posed" with the ink bottle it uses, so I took them together. The resulting crop excluded any of the actual woodworking, but I got the tip of the pen, which I think is more interesting.
Unfortunately, I've learned that the "incandescent" setting on my camera is basically just insufficient. I have a hard time correcting for that kind of a WB slip-up in Photoshop (although I didn't try it in Lightroom, which I think might do a better job), so when I revisit this, and do another shoot of the fountain pen, I'll probably just shoot it with a more neutral light color.
click to enlarge, or see it on Flickr Aperture: f/2.6
Shutter Speed: 1 second
ISO: 80
Gorilla Pod
Also, I'll probably clean the bottle (especially the dusty lid) and pen thoroughly first. I keep forgetting that macro shots expose details regardless of how unpleasant they are.
So a somewhat disappointing shot, but I'm armed to get it right next time.
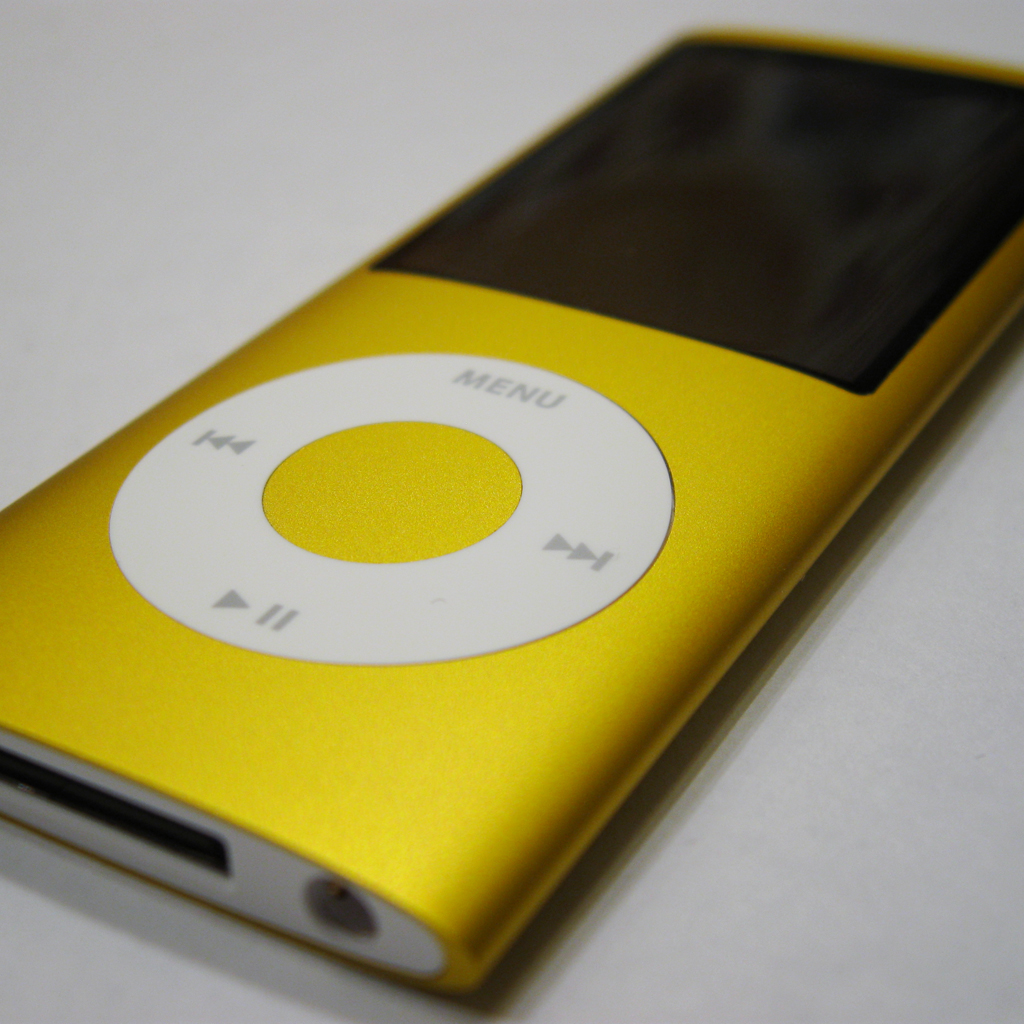
Last Saturday, I ordered a new iPod with some birthday money. This was to be a replacement for the iPod that got smashed in a luggage compartment on the plane home from New York City last April. I've been almost a year without one, and let me tell you. It's been tough.
Anyway, it got here yesterday, and it's awesome. I figured with the bright colors, etc. it would make a cool macro if I set it carefully on a white background.
click to enlarge, or see it on Flickr Aperture: f/2.6
Shutter Speed: 1/8
ISO: 80
Gorilla Pod
All I did in post was set the white balance using the technique discussed in this post, and then add what I call a "reverse vignette," which is just a white-to-transparent radial gradient from the center to the corners, with the layer style set to Overlay, at whatever opacity suits you. I used 30% here. It helps draw the eye to the center, but is even less noticeable than a vignette.
Other than that, this is the first photo that has ever made me wish for a light box. There are millions of tutorials out there to make your own for cheap-as-free, so maybe I'll try one out, just to get that literally perfect white background.
Yesterday evening, I was driving home when I noticed another one of those snow-melt puddles that collect all over the road. They make great reflective surfaces, but I saw that it looked even better at night; almost like a perfect mirror. As soon as I got home, I grabbed my gear and headed to the nearest suitable location.
click to enlarge, or see it on Flickr Aperture: f/4.5
Shutter Speed: 5 seconds
ISO: 80
Tripod
It turned out really nicely, I think. I completely ignored my light meter; it doesn't know what I want. The composition worked out well, and I'm glad to have a rock-solid tripod to hold my camera for really long exposures like this. Even at 5 seconds, I believe this was "underexposed" by about a stop.
In hindsight, maybe a slightly higher ISO would have worked for this. I really wanted to bring out the texture and contrast between the reflective areas of wet pavement and the shadows in the same pavement. On the other hand, the black would have been way more grainy than I wanted it. Maybe 80 was the way to go, but next time I'll be trying various ISOs.
I did almost nothing in PP. Bumped the contrast up by 3%, and added a somewhat large, but still rather unnoticeable vignette.
Anyway, this is my rebellious "break-all-the-rules" photo attempt. Severely underexposed, the histogram looks terrible, and I added a giant obvious vignette (which doesn't really count as rule-breaking, but it's definitely personal-code breaking).
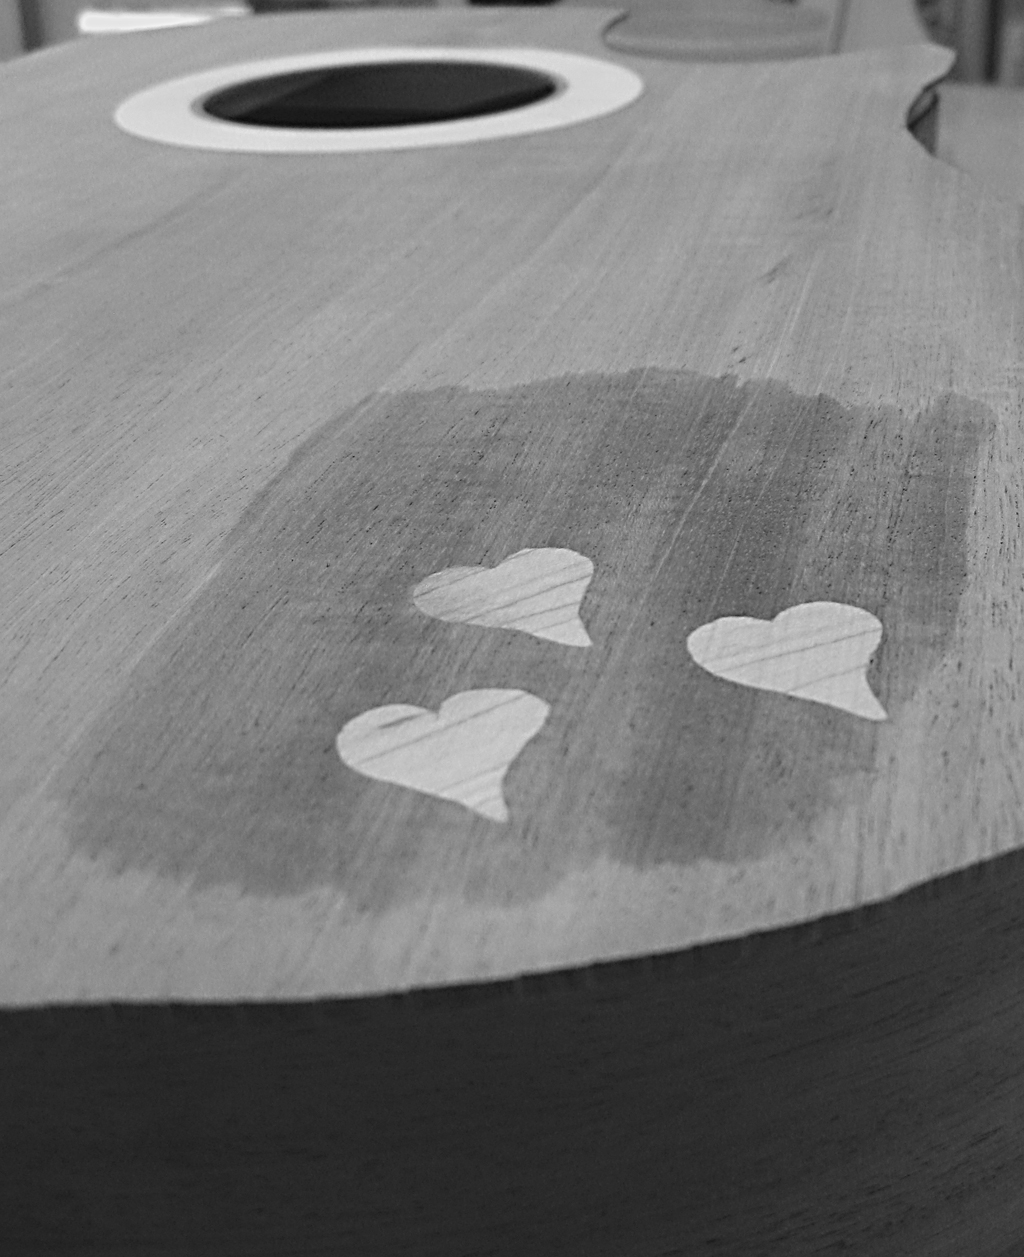
The last guitar-related picture I posted was a picture of machine heads that weren't intended for my guitar (and actually, wouldn't even work for it, as I'm not building a classical guitar). But this photo is actually one of my own guitar. It looks like the main body of the guitar is completed, but it's not. I just put the back on the table, the sides (which aren't completely done being bent, but really close) on top of that, and the soundboard on top of that, to get a rough feel for what it would look like completed.
click to enlarge, or see it on Flickr Aperture: f/2.6
Shutter Speed: 1/80
ISO: 80
Handheld
I started this shoot off just wanting a few pictures of my guitar for documentation purposes. Then I figured I might as well try to get some shots of real photographic value. I was in kind of a hurry though, so I didn't put on my macro lens. That's why this isn't as sharp as most of my macros—I was a little too close for my camera's built-in setting.
The wet spot is due to me putting water on the guitar. It gives a fair approximation of what the wood will look like under polish, so I just wanted to see what that area would look like. The wood in the soundboard is Honduras Mahogany, and the inlaid hearts (and rosette) are hard rock maple.
I liked it better in monochrome, so I stuck with that. Other than that, I just wish I had composed this a little more carefully. I was able to crop out most of the clutter-y, distracting background, but not all of it.
I seem to be pumping out failed time-lapses at a startling rate these days. While I was at first kind of hesitant to use one of my two video uploads for February on Flickr, I figured this was worth it. Every time I screw something up, I learn more about how to fix it.
The first problem with this video is that the sun never actually rises. It was the first non-foggy morning in a while, so I decided to try and get the sunrise. I was taking one photo per 8 seconds, and I was out in the cold repeating this for probably a solid 25 minutes. The clouds and sky kept getting brighter and brighter, but I was forced to pack up and head to school (school starts late this week for Juniors and Seniors due to Sophomore state testing) before it actually came out. There's no school Friday, so if I get another lucky fog-free morning, that problem is easy enough to solve.
My larger problem is my editing software. iMovie refuses to display stills for less than 3 frames, which makes my videos 3 times longer, 3 times slower, and 3 times choppier than I had planned. I'm in the process of finding a video editor that will put stills at 1 frame. I know my dad has an old copy of Final Cut Express somewhere, but I need to get the serial number off the box to use it. I've checked, and it looks like FCE will go down to 1 frame on stills for me. Furthermore, FCE will make high res videos. I've been shooting at a resolution of 1600x1200, and just batch re-sizing down to 640x480 before applying to iMovie, and even then I seem to be losing a lot of sharpness in my photos. If I can find the serial for FCE, that should solve both of my problems. I'll just have to crunch some numbers to get a new rate at which to take photos.
Anyway, this video looks pretty good considering everything that went wrong. The pink clouds look nice until they get washed out. The darkening at the end of the video is my own trying to adjust exposure gradually between shots so that the final frames weren't just pure white. Kind of a bad idea I think; a better approach would be to start my exposures at -2 stops (rather than -1, which is what I've been using) and hope that they don't overexpose too much when the sun does come out. A polarizer might be something to consider too.
Anyway, I only have one video upload to my free Flickr account this month, so if you see another video post, it means I finally got a time-lapse that I'm satisfied with. On a final note though, free Flickr accounts cannot have high-def videos uploaded, no matter the size. So unless I find $25 laying around that I have no use for, you'll be watching my videos in normal resolution. Sorry.
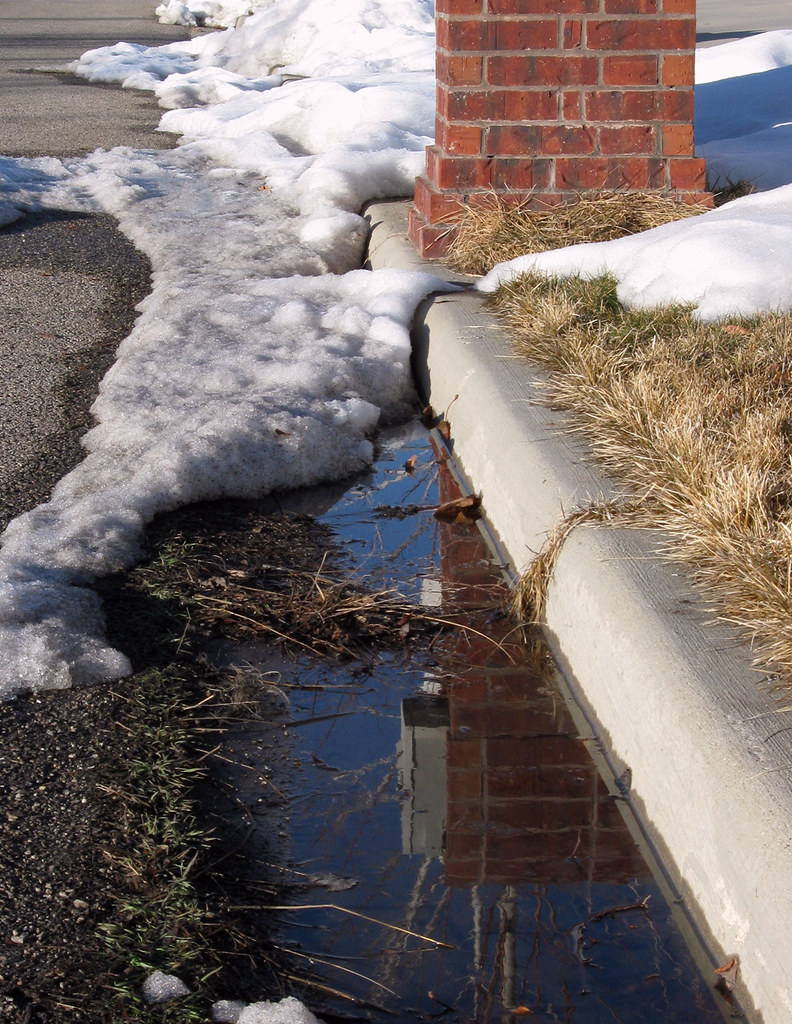
I've been noticing for weeks while driving that little pools of melted snow collect along the curbs, and have pretty startlingly clear reflections. I finally had some free time today, so I went out and shot the first one I could find. It had a pretty interesting subject in the reflection, but the composition is super iffy.
click to enlarge, or see it on Flickr Aperture: f/6.3
Shutter Speed: 1/250
ISO: 80
Monopod
Also, the photo has too many elements in it. It's hard to decide what to look at. The one good thing that can be said about this is that the exposure went really well. That doesn't make up for the fact that I would rather look at the histogram than the photo though.
Oh, well. One of these days, I'll see a good shot in one of these pools, and pull over and take it. Inspiration seems to strike when it's most inconvenient. But that's when I need to take it.
Feel free to distribute as desired, this is free for anyone to use however they want. Also, if there's a monitor size anyone needs that isn't up there, let me know and I'll throw one together.
Andrew Broekhuijsen has been living in Utah since the age of -9 months. He enjoys long walks on the beach, and flexing shirtless in the mirror. Oh, and photography. That too.


